Friday, December 20, 2013
Winter update
Over that past several weeks it has been relatively cold for this part of the country. Temperatures have gotten down into the 20s (Fahrenheit) at night and often not gone above freezing during the day. Today it was in the high 50s, and there was some definite activity around the entrance of one of the hives. The other hive had no signs of life, so I opened it up. Sure enough the bees were all dead. They still had quite a bit of honey, but it wasn't near where the main bee cluster had been. I can't remember if this was the hive with a queen or not.
Sunday, October 13, 2013
Winding Down for Winter
This past week has been rainy and in the 50s (degrees Fahrenheit), so I've seen little activity and wasn't able to open the hives up. I do know that, when I checked the previous week, the new hive (the one with the old queen) was doing very well while the old hive was not. Based upon the decreasing hive population and the sporadic laying of drone egg, it appears that the hive never was able to produce a new queen.
As the season draws down, I assume that I'll reporting less often, but, if they survive the winter, I hope to start posting again in the spring.
As the season draws down, I assume that I'll reporting less often, but, if they survive the winter, I hope to start posting again in the spring.
Friday, October 4, 2013


Friday, September 13, 2013
Drones Hanging Around
 |
| This afternoon, for the first time in many weeks, I observed a drone hanging around the hive. I see it as a positive sign, as I had been concerned about the new queen not being able to find males at this time of year. |
 |
 |
| The Bidens sp. is continuing to flower, although they do appear to be decreasing in quantity. |
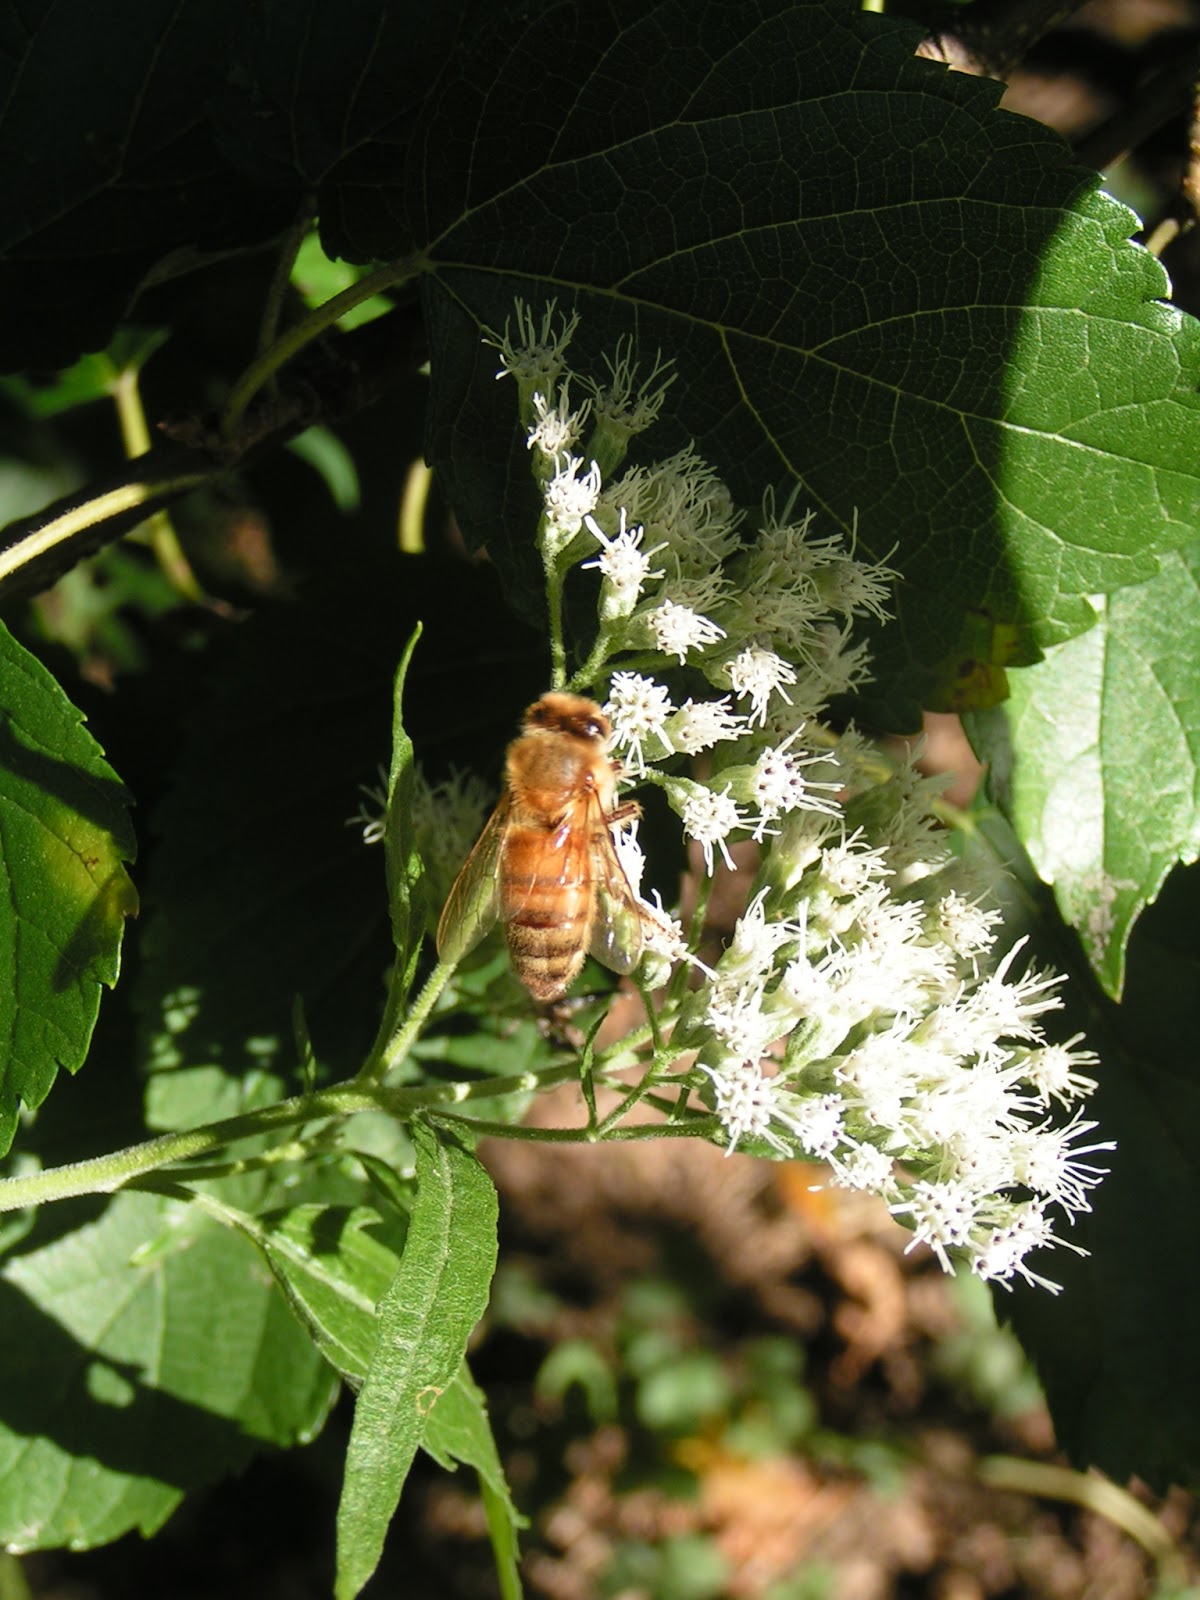 |
| The Ageratina altissima, however, is now at it's peek. |
 |
| Also nearing its peak is Solidago sp. |

 |
| The first few Helianthus tuberosus (Jerusalem artichoke) flowers are starting to open. |
 |
| When the H. tuberosus tubers are planted in good soil with plenty of spacing, they can grow very tall. |


Thursday, September 5, 2013
More Bidens sp. Flowers

.JPG)

Sunday, September 1, 2013
I was right!
 |
| A swarm cell. |
I checked the two hives yesterday and made some interesting observations. First, the queen was actually in the new, smaller hive. I had initially assumed that she was still in the older hive because this would be statistically more likely (i.e. I had transferred only a few brood combs to the new hive and the odds that she would have been on one of those combs during the transfer were less than the odds she was on the untouched combs) and because the bees in the new hive were behaving so defensively (which can be a sign that they lack a queen). However, during my inspection of the older hive, I encountered a capped emergency queen cell on a comb near the front of the hive. When I encountered this, I immediately opened up the smaller new hive and, sure enough, there she was. I then closed up the new hive and resumed inspection of the older hive.
It was at this point that I made my second observation: loads of capped swarms cells! To explain why this is so significant, I first need to explain the difference between "emergency queen cells" and "swarm cells." When a hive is strong with a large population and plenty of resources, the bees may decide to swarm or split into two hives. Of course, when you have two hives you need two queens, so, prior to splitting, the bees begin to grow a new queen in what is called a "swarm cell" (actually they will grow several potential queens that will duke it out when they hatch). Just as worker bees are raised from eggs in the familiar hexagonal cells we see in wax comb, a queen bee is raised in a much larger specially built wax cell that is called a "queen cell." If the hive is planning to raise a new queen (e.g. when they are planning to swarm), these cells will typically be built along the side and bottom edges of the comb.
 |
| "Swarm Cells" - A swarm cell starts out as a small shallow up-side-down wax cup that the worker bees build along the edges of the comb. Then the queen lays an egg in the cup and, as the egg hatches and the larva grows, the sides of the cup are expanded downward until the cell is capped with wax for the last phase of development. At this point, the old queen flies off with a portion of the bees, finds a new hive location, and rebuilds. |
 |
| "Emergency queen cells" are fewer in number and can be found sticking out of the center of a patch of brood comb. |

 As you may recall from my previous posts, I had begun to suspect that the bees in my single large hive might try swarming in the near future. You may also recall that, although I did not see any hard evidence, such as swarm cells, I had decided to pre-empt the possibility of a swarm by splitting the hive into two hives. Well, now that I've found between 15 and 20 swarm cells in the older hive, it appears that I have confirmation and wasn't entirely crazy.
 With this confirmation comes the new possibility of a "secondary swarm." I've read that, sometimes, when a hive is very large, the first new queen to hatch will also decide to leave the hive or swarm with a portion of the hive's workers.
Consequently, in an attempt to mitigate this concern, I've spent the last day building two small bate-hives designed to attract swarming bees.

Here are some of the flowers that can currently be found blooming in my area.
 |
| Bidens sp. flower. |
 |
| More Bidens sp. flowers. |
 |
| Curcurbita moschata male flower. |
 |
| Curcurbita moschata fruit. |
 |
| Ageratina altissima flowers. |
 |
| Rubeckia hirta flower. |
 |
| Eupatorium perfoliatum flower. |
Thursday, August 29, 2013
Post split activity
 |
| The day after the split the new hive's bee began to slowly emerge. |
 |
| Some of these emerging bee appear to have returned to the old hive and very few of the remaining bees forage. |
 |
Foraging activity in the old hive appears to hive picked up now that the entrances aren't clogged with surplus bees. Currently, there appears to be a lot of pollen foraging. |
 |
| I also got to watch a newly emerged cicada as it perched on the top of the new hive and waited for its wings to expand and harden. |


Hive Splitting
For a number of reasons I decided, last weekend, to split my large hive into two hives. Normally, I wouldn't think of doing so in late summer, but I think that, under my specific circumstances, it was a prudent choice.
As rare as it is for European honey bees to swarm at this time of the year, I suspect that, within the next few weeks, my hive would have swarmed. Over the last month or two I've observed a massive upswing in the hive population and a growing number "queen cups" being constructed. Along with this increase in population, there's also been a growing clump of bees accumulating at the front of the hive. These bees (several thousand) occupied both the inside and outside of the entrance area of the hive to the point that all of three holes at the top of the entrance were completely blocked. Then, most recently, I noticed a small cloud of bees whirling about in front of the hive.
Normally, if I lived in a more isolated area, I would have placed a few empty beehives in the area and hoped that, when the bees did swarm they would settle in one of these hives. However, as a responsible citizen in a residential area, I believe that it is in everyone's interest (including the bees) to try to be proactive, which is why I split the hive.
While researching hive splitting, I found a number of different methods, but in the end, I decided to just move a third of the comb to the other hive. I felt that this proportion would allow the original hive to continue as a strong hive and still give the new hive a fighting chance. About two thirds of the comb had a lot of brood and eggs in various stages of development, while the other third was loaded with honey. In order to survive, they need to grow a new queen, have her mate successfully, build up their population and put enough pollen and honey away to last the winter. I'm not sure if the new hive will survive, but I think it was necessary for me to do and I'll try to help them as much as I can.
Saturday, August 24, 2013
Humidity Cicuit Update
After rechecking the parameters for the HCH-1000, I observed that the normal operating frequency range is actually 1kHz - 100kHz, so I reset my desired frequency to 2kHz and recomputed the Ra and Rb values. The resulting adjusted resistances were: 43,000 and 1,100,000 Ohms.
I tested the circuit with these values by simulating it in KTechlab. For the simulation, I created one circuit with a capacitance set to 310pF and a second circuit with a capacitance set to 350pF. The simulation produced outputs with the expected variance.
KTechlab has good visualization, but I wasn't able to find a good numerical output (I admit I didn't try very hard), so I added a function to my previously posted T555.py script that graphs the calculated frequency.

The next step is to build the prototype and test it.
I tested the circuit with these values by simulating it in KTechlab. For the simulation, I created one circuit with a capacitance set to 310pF and a second circuit with a capacitance set to 350pF. The simulation produced outputs with the expected variance.
 |
| Circuits with different capacitors (310pF on left and 350pF on right) with corresponding waveform outputs. |

The next step is to build the prototype and test it.
Saturday, August 17, 2013
Bottom boards reattached
When I constructed the two hives, I gave one of them a removable bottom board and wire screen. During the summer, when the outdoor temperatures get into the 90's (Fahrenheit), having only a screen bottom allows the bees to regulate the hive temperature more easily and also allows debris to fall through. Lately, though, temperatures have been getting cooler with night-time lows down in the 50's, so yesterday I reattached the bottom board.
Monday, August 12, 2013
Placing the camera amongst the hive brood
Recently, I had the idea to try to place the hive camera within the brood section of the hive to see if I could get close up video of the bees as they grow. To do this, I decided to try to make the camera as much a part of the hive as much as possible by persuading the bees to embed the camera within the wax comb. To encourage this process, I adhered wax-soaked cotton string along the top of the wooden bar and along the sides of the camera housing and placed it in the brood area of the hive during a routine inspection.

During my last routine inspection, I check the camera to see how things were going. It appears the bees are on their way toward embedding the camera. Interestingly, based on the color of the wax, this comb is not entirely made from fresh wax as it was in the spring when I first introduced the bees. At least some of the wax appears to have been re-purposed from other locations in the hive.


During my last routine inspection, I check the camera to see how things were going. It appears the bees are on their way toward embedding the camera. Interestingly, based on the color of the wax, this comb is not entirely made from fresh wax as it was in the spring when I first introduced the bees. At least some of the wax appears to have been re-purposed from other locations in the hive.


Sunday, August 11, 2013
Bees still eating more sugar
Yesterday, I again checked the level of the sugar syrup I had placed in the hive the day before and it was once again empty. I, again, filled the container with concentrated syrup and plan to check it this afternoon.
Saturday, August 10, 2013
Building the humidity sensor circuit
With the wife out-of-town on business, I've been able to spend some time experimenting with the circuitry I'll need to construct the capacitive humidity sensor.
Previously, I had constructed a prototype based upon schematics I found on the Internet for an Arduino weather station, which used the same HCH-1000 sensor. I tested the circuit in KTechlab and it seemed to simulate very well. However, in my rush to produce the circuit, I made some mistakes while adapting it to a much smaller SMD populated circuit, and ended up burning my finger quite badly during testing. It's a long story, but, needless to say, I've relearned my lesson. Whenever you are building a circuit, it's always better to have a full understanding of what's happening within that circuit rather than just assembling it from a schematic.
With this in mind, I spent much of yesterday re-immersing myself in the properties of our good friend the 555 timing circuit. About two or three years ago, I had used the 555 to build a heterodyning ultrasonic bat detector, but I haven't worked much with them since and forgot most of the basics. Specifically, I'm referring to astable operations in which the 555 is configured with two resistors and a capacitor to create a multivibrator (i.e. oscillator). Adjusting either of the two resistors or the capacitor will change the nature of the oscillation frequency. There are a few useful equations which can be used to determine the outcomes of different combinations of resistors and capacitors, which I have captured in an annotated Python script called T555.py.
# -*- coding: utf-8 -*-
"""
Created on Fri Aug 9 12:20:02 2013
@author: dan
"""
# capacitance is in Farads and resistance is Ohms
#Calculates the charging time of the capacitor (C) for resistor a (Ra) and resistor b (Rb).
def chT(Ra,Rb,C):
cT = 0.693*(Ra+Rb)*C
return cT
#Calculates the capacitor discharge time
def dT(Rb,C):
diT = 0.693*Rb*C
return diT
#Calculates the time for both capacitor charge and discharge
def TT(Ra,Rb,C):
cT = chT(Ra,Rb,C)
diT = dT(Rb,C)
T = cT + diT
return T
# Calculates the oscillation frequency output produced by Ra, Rb, and C
def Freq(Ra,Rb,C):
O = 1.44/((Ra+(2*Rb))*C)
return O
#Calculates the duty cycle produced by the resistors and capacitors, which is a proportion comparing the charge time to the discharge time.
def dC(Ra,Rb):
D = float(Rb)/(Ra+(2*Rb))
return D
#Calculates the combined value of both resistors based upon the known oscillation and capacitance
def AB2(O,C):
ab2 = 1.44/(C*O)
return ab2
# Calculates the individual values of Ra and Rb based upon the known duty cycle, oscillation, and capacitance
def AB(D,O,C):
ab2 = 1.44/(C*O)
Rb = ab2*D
Ra = ab2-(Rb*2)
print "Resistor A: " + str(format(int(Ra),","))
print "Resistor B: " + str(format(int(Rb),","))
# Reports calculations for charge time, discharge time, total time, frequency, and duty cycle.
def rt(Ra,Rb,C):
cT = chT(Ra,Rb,C)
diT = dT(Rb,C)
T = cT + diT
O = 1.44/((Ra+(2*Rb))*C)
D = float(Rb)/(Ra+(2*Rb))
print "Charge time (seconds): " + str(cT)
print "Discharge time (seconds): " + str(diT)
print "Total time (seconds): " + str(T)
print "Frequency (Cycles per Second): " + str(O)
print "Duty cycle: " + str(D)
In addition to the above script, I also wrote a script called Farads.py that gives you easy conversions between commonly used Farad units. I did this because I loath making these conversions.
# -*- coding: utf-8 -*-
"""
Created on Fri Aug 9 13:57:53 2013
@author: dan
"""
def cF(number,faradunit):
if faradunit == "F":
F = number
elif faradunit == "mF":
F = float(number)/1000
elif faradunit == "uF":
F = float(number)/1000000
elif faradunit == "nF":
F = float(number)/1000000000
elif faradunit == "pF":
F = float(number)/1000000000000
else:
print "faradunit must be F, mF, uF, nF, or pF"
mF = F*1000
uF = F*1000000
nF = F*1000000000
pF = F*1000000000000
print "farads: " + str(format(F,",")) + " F"
print "millifarads: " + str(format(mF,",")) + " mF"
print "microfarads: " + str(format(uF,",")) + " uF"
print "nanofarads: " + str(format(nF,",")) + " nF"
print "picofarads: " + str(format(pF,",")) + " pF"
Once these scripts were placed in my "site-packages" folder, I was able to use the following workflow:
At 55% relative humidity, the HCH-1000 has a normal capacitance of 330 pico Farads. Let's say that I want to measure the capacitance of the HCH-1000 500 times per second (I still haven't figured out what the ideal measurement frequency would be for Arduino, so this is just a place holder) and a duty cycle of 0.50. In python I would do the following:
>>> import Farads as F
>>> F.cF(330,"pF")
the program would then return:
farads: 3.3e-10 F
millifarads: 3.3e-07 mF
microfarads: 0.00033 uF
nanofarads: 0.33 nF
picofarads: 330.0 pF
next, I type:
>>> import T555 as T
>>> T.AB(0.49,500,3.3e-10)
note that I use 0.49 and not 0.50. This is because 0.50 is and ideal number that produces an Ra value of 0.
The results are:
Resistor A: 174,545
Resistor B: 4,276,363
Now, using a table for commonly used resistor values, I see that 180,000 and 4,300,000 Ohm resistors are likely to exist. It may be likely that these slight changes to the resistance values will have little effect, but I can test is to be sure:
>>> T.rt(180000,4300000,3.3e-10)
Which returns:
Charge time (seconds): 0.0010245312
Discharge time (seconds): 0.000983367
Total time (seconds): 0.0020078982
Frequency (Cycles per Second): 496.997307931
Duty cycle: 0.489749430524
This close enough. I'll write more later, but I wanted to note one more thing. Yesterday, I checked the status of a container of sugar water I had placed in the beehive the day before to feed the bees. It was completely empty! They had managed to drink more than a gallon of 1:1 sugar/water solution in less than 24 hours. In response, I created a new batch of 2:1 sugar/water solution and placed it in the hive yesterday evening. I'll be interested in checking again today to see how far they've gotten with that batch.
Friday, August 9, 2013
More changes
Over the past few weeks I've noticed that it's getting harder to approach the hive without being pestered by what I like to call "interrogator bees." These bees like to fly up to your head and buzz rapidly back-and-forth. So far they haven't done anything more aggressive, but they are very persistent.
Another thing I've noticed has been an apparent increase in the young bee population. These younger bees spend a great deal of their time wash-boarding, and festooning, and don't have much interest in foraging. This preoccupation with wash-boarding and festooning, has become so intense that they have completely blocked off the upper entrance holes in the hive leaving only the bottom two holes for foragers. What are they up to?
There are still few, if any, drones, and they are continuing to build up pollen reserves. I see very little capped honey.
Saturday, August 3, 2013
Drones are gone
I did a hive inspection yesterday and noticed that throughout the entire hive there are no drone larvae or pupae. All comb sized for drones is either completely empty or being used to store nectar. I also noticed no adult drones in the hive or hanging around outside the hive as they often did. There are, however, plenty of female workers and many more on the way. There is also some honey, a reasonable amount of nectar, and a lot of pollen. One of the combs is even completely filled with pollen on both sides. Nonetheless, I'll probably want to feed them a few more times before winter starts.
One interesting thing I noticed the other week on the 17th comb from the entrance was the formation of several queen cups along to side edges of the comb. These a small up-side-down cups that worker sometimes build along the edges of combs. They are used to grown new queens. Although I haven't seen the queen I know that she is still laying eggs, so I'm not sure what the queen cups mean. I'll want to keep and eye on it.
One interesting thing I noticed the other week on the 17th comb from the entrance was the formation of several queen cups along to side edges of the comb. These a small up-side-down cups that worker sometimes build along the edges of combs. They are used to grown new queens. Although I haven't seen the queen I know that she is still laying eggs, so I'm not sure what the queen cups mean. I'll want to keep and eye on it.
Thursday, August 1, 2013
One full day inside the hive - time lapse
What follows is one complete day of hive videos slowed down to half the original playback speed. Also, after the video, I've included the ffmpeg script I used to concatenate the videos.
$ ffmpeg -i 20130731094820-timelapse.mpg -filter:v 'setpts=2.0*PTS' -qscale:v 1 i1.mpg; ffmpeg -i 20130731104820-timelapse.mpg -filter:v 'setpts=2.0*PTS' -qscale:v 1 i2.mpg; ffmpeg -i 20130731114820-timelapse.mpg -filter:v 'setpts=2.0*PTS' -qscale:v 1 i3.mpg; ffmpeg -i 20130731124820-timelapse.mpg -filter:v 'setpts=2.0*PTS' -qscale:v 1 i4.mpg; ffmpeg -i 20130731134820-timelapse.mpg -filter:v 'setpts=2.0*PTS' -qscale:v 1 i5.mpg; ffmpeg -i 20130731144830-timelapse.mpg -filter:v 'setpts=2.0*PTS' -qscale:v 1 i6.mpg; ffmpeg -i 20130731154830-timelapse.mpg -filter:v 'setpts=2.0*PTS' -qscale:v 1 i7.mpg; ffmpeg -i 20130731164830-timelapse.mpg -filter:v 'setpts=2.0*PTS' -qscale:v 1 i8.mpg; ffmpeg -i 20130731174830-timelapse.mpg -filter:v 'setpts=2.0*PTS' -qscale:v 1 i9.mpg; ffmpeg -i 20130731184830-timelapse.mpg -filter:v 'setpts=2.0*PTS' -qscale:v 1 i10.mpg; ffmpeg -i 20130731194840-timelapse.mpg -filter:v 'setpts=2.0*PTS' -qscale:v 1 i11.mpg; ffmpeg -i 20130731204840-timelapse.mpg -filter:v 'setpts=2.0*PTS' -qscale:v 1 i12.mpg; ffmpeg -i 20130731214840-timelapse.mpg -filter:v 'setpts=2.0*PTS' -qscale:v 1 i13.mpg; ffmpeg -i 20130731224841-timelapse.mpg -filter:v 'setpts=2.0*PTS' -qscale:v 1 i14.mpg; cat i1.mpg i2.mpg i3.mpg i4.mpg i5.mpg i6.mpg i7.mpg i8.mpg i9.mpg i10.mpg i11.mpg i12.mpg i13.mpg i14.mpg > i_all.mpg; ffmpeg -i i_all.mpg -qscale:v 14 -c copy beehive20130731b.avi
$ ffmpeg -i 20130731094820-timelapse.mpg -filter:v 'setpts=2.0*PTS' -qscale:v 1 i1.mpg; ffmpeg -i 20130731104820-timelapse.mpg -filter:v 'setpts=2.0*PTS' -qscale:v 1 i2.mpg; ffmpeg -i 20130731114820-timelapse.mpg -filter:v 'setpts=2.0*PTS' -qscale:v 1 i3.mpg; ffmpeg -i 20130731124820-timelapse.mpg -filter:v 'setpts=2.0*PTS' -qscale:v 1 i4.mpg; ffmpeg -i 20130731134820-timelapse.mpg -filter:v 'setpts=2.0*PTS' -qscale:v 1 i5.mpg; ffmpeg -i 20130731144830-timelapse.mpg -filter:v 'setpts=2.0*PTS' -qscale:v 1 i6.mpg; ffmpeg -i 20130731154830-timelapse.mpg -filter:v 'setpts=2.0*PTS' -qscale:v 1 i7.mpg; ffmpeg -i 20130731164830-timelapse.mpg -filter:v 'setpts=2.0*PTS' -qscale:v 1 i8.mpg; ffmpeg -i 20130731174830-timelapse.mpg -filter:v 'setpts=2.0*PTS' -qscale:v 1 i9.mpg; ffmpeg -i 20130731184830-timelapse.mpg -filter:v 'setpts=2.0*PTS' -qscale:v 1 i10.mpg; ffmpeg -i 20130731194840-timelapse.mpg -filter:v 'setpts=2.0*PTS' -qscale:v 1 i11.mpg; ffmpeg -i 20130731204840-timelapse.mpg -filter:v 'setpts=2.0*PTS' -qscale:v 1 i12.mpg; ffmpeg -i 20130731214840-timelapse.mpg -filter:v 'setpts=2.0*PTS' -qscale:v 1 i13.mpg; ffmpeg -i 20130731224841-timelapse.mpg -filter:v 'setpts=2.0*PTS' -qscale:v 1 i14.mpg; cat i1.mpg i2.mpg i3.mpg i4.mpg i5.mpg i6.mpg i7.mpg i8.mpg i9.mpg i10.mpg i11.mpg i12.mpg i13.mpg i14.mpg > i_all.mpg; ffmpeg -i i_all.mpg -qscale:v 14 -c copy beehive20130731b.avi
Sunday, July 28, 2013
Some intial returns on the video
Fully Automated Beehive Surveillance
I've finally managed to acquire
and configure all of the different elements needed to enable
continuous, around-the-clock video monitoring of the inside of my
beehive. The camera inside my hive is the same one described in
my previous posts, but I no longer have to connect it directly to my
laptop in order to use the camera. Now, the camera is
controlled by a Raspberry Pi housed in an aluminium box on the
underside of the hive with videos periodically being uploaded to my
Network Attached Storage (NAS) device via a wifi connection.
When ever I want to view the latest internal video of my hive, I
simply connect to my server and view the video.
Setting up this system took a lot of research and experimentation, so I'll probably require a series of posts to completely explain it. For now, I will describe what steps I took to configure the Raspberry Pi.
Initial configuration -
To configure my Raspberry Pi, I took the following steps:
1) Create root (su) account:
Configuring motion -
For my project, I decided to use the program 'motion' to control the camera. As a program, motion has a wide variety of user options that can be set in the motion configuration files. For my project, I mode the following changes
1) threshold 0 - this disables the motion activated filming
2) norm 1 - I forget what this does
3) rotate 90 - rotates any videos or images captured with motion 90 degrees right
4) ffmpg timelapse 20 - enables time-lapse movies and sets the time between frames to 20 seconds
Connecting to the NAS -
$ mount /home/username/nfsmount
Bringing it all together -
For the final element of this project I needed to create a small script that would automatically start at boot and continue to run in the background. To do that I had to learn some new things about using shell scripts. Here is the main shell script that I eventually settled upon:
#!/bin/sh
sleeprun(){
#sleep 86400 - one day
for process in $(pidof motion)
do
kill $process
done
mv /home/username/Videos/motion/*.mpg /home/username/Videos
motion -c /etc/motion/motion.conf
sleep 680
}
load2NAS(){
mount /home/username/nfsmount
sleep 15
mount /home/username/nfsmount
mv /home/username/Videos/*.mpg '/home/username/nfsmount/Shared Files/Videos'
sleep 5
umount /home/username/nfsmount
}
while :
do
sleeprun
load2NAS
done
The first function kills any motion programs currently running, moves any videos in the motion output folder to a different local directory, restarts the motion daemon, and, then, goes to sleep for however many seconds you want it to sleep. The second function mounts the NAS to the Raspberry Pi, sleeps for 15 seconds, tries to mount the NAS again in case the first attempt failed, moves any videos in the secondary local directory to a folder on the NAS and unmounts the NAS. Finally, at the end of the script I have an infinite loop set to run the two functions over and over.
In order to have this script start up at boot, I had to add 'su username -c /home/username/scripts/motion_script.sh &' to '/etc/rc.local' just above "exit 0" and 'su -l username -c startx'. To give rc.local permission to execute motion_script.sh, I had to enter:
Setting up this system took a lot of research and experimentation, so I'll probably require a series of posts to completely explain it. For now, I will describe what steps I took to configure the Raspberry Pi.
Initial configuration -
To configure my Raspberry Pi, I took the following steps:
1) Create root (su) account:
$sudo
passwd root
enter password for root
2)
Create new user, transfer groups from pi to new user, and delete pi:
#
adduser username
#
groups pi
output
with be something like: pi adm dialout cdrom ...
copy
the groups from this output for use in the following
#
usermod -a -G pi,adm,dialout,cdrom... username
in this case you are replacing the
spaces in between the groups in the output with commas
#
groups username
this is to confirm the new user now
has the same groups as pi
# deluser -remove-home pi
this will remove pi's home
directory as well as the user.
3) Once root account and username
are created with strong passwords, connect to internet and run the
following as root:
# apt-get update
# apt-get upgrade
4)
Auto-login:
#
nano /etc/inittab
Change
it from:
1:2345:respawn:/sbin/getty --noclear 38400 tty1
1:2345:respawn:/sbin/getty --noclear 38400 tty1
to:
1:2345:respawn:/bin/login -f username tty2 </dev/tty1 >/dev/tty2 2>&1
1:2345:respawn:/bin/login -f username tty2 </dev/tty1 >/dev/tty2 2>&1
5)
Auto desktop launch:
#
nano /etc/rc.local
add
su -l
username -c startx
at
the end above “exit 0”
6) To
change default keyboard to us instead of uk:
#
nano /etc/default/keyboard
change
'gb' to 'us'
Configuring motion -
For my project, I decided to use the program 'motion' to control the camera. As a program, motion has a wide variety of user options that can be set in the motion configuration files. For my project, I mode the following changes
1) threshold 0 - this disables the motion activated filming
2) norm 1 - I forget what this does
3) rotate 90 - rotates any videos or images captured with motion 90 degrees right
4) ffmpg timelapse 20 - enables time-lapse movies and sets the time between frames to 20 seconds
Connecting to the NAS -
To
setup the NAS connection, I needed to first create a local mount
point
#
mkdir /home/username/nfsmount
After that all I need to do is
enter the mount command
# mount -v -t nfs
192.168.2.102:/mnt/NASName -o vers=2,nolock
/home/username/nfsmount
However, because I was eventually
automating this entire process, I instead had to enable the NAS to be
mounted by a regular user which required an additional entry into
fstab.
#
nano /etc/fstab
add
'192.168.2.102:/mnt/NASName /home/username/nfsmount
nfs rw,nolock,noauto,user 0 0'
To
mount and unmount NAS as a regular user:
$ mount /home/username/nfsmount
$
umount /home/username/nfsmount
For the final element of this project I needed to create a small script that would automatically start at boot and continue to run in the background. To do that I had to learn some new things about using shell scripts. Here is the main shell script that I eventually settled upon:
#!/bin/sh
sleeprun(){
#sleep 86400 - one day
for process in $(pidof motion)
do
kill $process
done
mv /home/username/Videos/motion/*.mpg /home/username/Videos
motion -c /etc/motion/motion.conf
sleep 680
}
load2NAS(){
mount /home/username/nfsmount
sleep 15
mount /home/username/nfsmount
mv /home/username/Videos/*.mpg '/home/username/nfsmount/Shared Files/Videos'
sleep 5
umount /home/username/nfsmount
}
while :
do
sleeprun
load2NAS
done
The first function kills any motion programs currently running, moves any videos in the motion output folder to a different local directory, restarts the motion daemon, and, then, goes to sleep for however many seconds you want it to sleep. The second function mounts the NAS to the Raspberry Pi, sleeps for 15 seconds, tries to mount the NAS again in case the first attempt failed, moves any videos in the secondary local directory to a folder on the NAS and unmounts the NAS. Finally, at the end of the script I have an infinite loop set to run the two functions over and over.
In order to have this script start up at boot, I had to add 'su username -c /home/username/scripts/motion_script.sh &' to '/etc/rc.local' just above "exit 0" and 'su -l username -c startx'. To give rc.local permission to execute motion_script.sh, I had to enter:
$
chmod +x /home/username/scripts/motion_script.sh
Finally,
when all was done, I decided to disable the gui interface on boot by
commenting out “su -l username
-c
startx” in rc.local.
First videos -
Earlier
today I was able to install everything in the hive and I've already
gotten the first video. This videos (below) shows images from
both before and during the installation and, consequently, isn't very
good. However, it is still the first video.
Sunday, July 21, 2013


.jpg)
Subscribe to:
Posts (Atom)